
QUICK ANSWER
The campaign has four main chapters. Restore the attraction’s power, work through the excavation, follow the trail into the deep caverns, then bring DJ back to the surface. The basement code is 1903; the foreman’s code is 0451. Other keypad clues must be read in your own playthrough.
Using this Terrible Lizards walkthrough
Choose the section matching your current objective rather than judging progress by a video’s running time. Exploratory detours, deaths and collectible searches make recordings very different lengths. This Terrible Lizards walkthrough prioritizes the main route; optional tapes and amber are not a complete collectible checklist.
Read the next interaction prompt before committing to a jump. Movement, power restoration and opening routes are the recurring solutions. Follow your chosen control layout instead of treating a keyboard input from a video as universal. The later scripted firearm interaction does not turn the game into a weapon-based combat campaign.
| Chapter | Your main objective | Recording reference |
|---|---|---|
| 1 — Attraction | Restore power and escape the exhibits | Start to 46:30 |
| 2 — Excavation | Generators, damaged keypad and demolition | 46:30–1:41:04 |
| 3 — Deep caverns | Traversal, lift and minecart power | 1:41:04–2:53:58 |
| 4 — Project Pilgrim | Find DJ, retrieve the key and escape | 2:53:58 onward |
References: FusionZGamer — full-game recording ↗
Chapter 1: the attraction and first escape
The opening part of this Terrible Lizards walkthrough moves from a visitor attraction into its staff areas. Keep the torn-paper entrance clue separate from the basement code that Stella gives you later; they are different doors.
- At the entrance, collect both torn pieces of the paper clue and combine their digits. Read the pieces in your own game. Published runs show different numbers, so a code copied from a video can fail even when you have found the right keypad.
- Work through the theatre and exhibit interactions before trying to bypass the attraction. Use the token, projector and exhibit controls as prompted. If the show has not finished, give the sequence time to complete before looking for the onward exit.
- At the Dilophosaurus activity area, complete the interaction sequence and collect the flashlight. Follow the opened exhibit route toward the gift shop; the dinosaur displays are useful landmarks for retracing your path.
- In the gift-shop office, inspect the VHS material and answer Stella. Her call changes the immediate goal from exploring the displays to restoring power. Use 1903 at the basement door when that objective becomes available.
- Collect the replacement fuses in the basement and return to the attraction’s power connections. Check the active objective before leaving a panel: carrying a fuse and installing it are different steps.
- Use the upper platforms to reach the power controls while the large creature threatens the room. Complete the required connections and the floodlight interaction; simply staying above the floor will not finish the objective.
- When the intended exit is destroyed and the chase starts, turn onto the newly available escape route. Keep looking ahead for the next platform instead of trying to fight the creature. The route leads away from the attraction into the underground excavation.
Terrible Lizards walkthrough code check: the basement’s spoken 1903 is consistent across the supplied recordings. Entrance examples differ. That difference does not prove whether the game randomizes codes; the clue in your installation remains the authority.
References: FusionZGamer — full-game recording ↗ · TheGamingBeaver — full-game recording ↗ · Into Indie Games — chapter one walkthrough ↗
Chapter 2: generators, keypads and dynamite
This Terrible Lizards walkthrough section follows the excavation’s chain of dependencies. A powered door can still require a working keypad, and a repaired keypad can still need a code from a nearby record. Solve those conditions in order.
- At the tunnel security area, follow the power routes into the two side caverns and start both generators. Return to the foreman’s tower after restoring their power; repeatedly pressing the security control before that will not substitute for the generators.
- Use 0451 for the foreman’s access when Stella supplies it. Operate the security controls to continue into the upper excavation. In the FusionZGamer recording, the spoken code appears around 48:36.
- Inspect the damaged keypad. Search the accessible upper route for replacement keypad parts, return to repair it, then consult the field-lab record for the number. Supplied runs show different digits here, so this Terrible Lizards walkthrough deliberately does not give a universal replacement code.
- Continue through the excavation’s power-control objectives. Keep track of which switches you have actually operated before moving toward the lift. If a route remains closed, check the objective and power state rather than assuming the last numerical code was wrong.
- At the lift access, use 1677 when Stella gives the code. Complete the associated power/fuse interaction and operate the lift controls. The recording reaches this exchange around 1:22:35; it is a useful checkpoint if you are comparing rooms.
- Follow the onward machinery and timed-door route toward the demolition supplies. Use 0180 for the dynamite locker when instructed; that exchange is around 1:37:38 in the recording.
- Collect the demolition supplies, place charges at the indicated objective positions and return to the detonator. If it does nothing, check whether every placement prompt has been completed. The Terrible Lizards walkthrough route continues through the opened path and the subsequent collapse into the deeper caverns.
The dynamite locker is not the damaged keypad. Keep 0180 for the locker, and use your field-lab clue for the repaired panel. Creature encounters also change across this chapter; a tactic tied to one room is not a universal dinosaur rule.
References: FusionZGamer — full-game recording ↗ · TheGamingBeaver — full-game recording ↗ · Into Indie Games — chapter two walkthrough ↗
Chapter 3: deep caverns and the minecart
Chapter 3 is the longest exploratory stretch in this Terrible Lizards walkthrough. The route below identifies the main objective sequence and recognizable mechanisms. It is a route summary: it does not claim to show every optional alcove or every fuse’s exact coordinates.
Use the contrasting goo-covered surfaces and the metal traversal structures to read the intended route. Learn each new movement prompt before combining it with a chase. If a monster is pressuring you, prioritize the route and objective; do not assume a safe-looking ledge prevents every creature from reaching you.
- Continue through the deeper dig site and the encounter near the trapped worker Sid. Follow the available path rather than waiting for a rescue outcome that this guide does not establish. The supplied recording reaches this area at about 1:50.
- Work through the cart, power and gate interactions around the excavation. Inspect the mechanism itself before hunting for a distant key: some barriers depend on moving equipment into place rather than entering a code. The sequence is visible around 1:56:59–2:00:51.
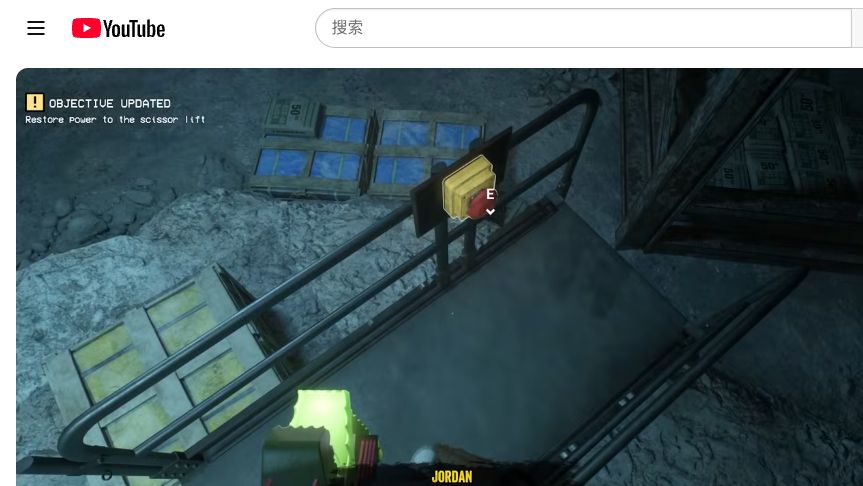
- Use the newly introduced traversal surfaces to reach the scissor lift. Around 2:20:28–2:20:49, the recording identifies this lift as the next mechanism. The yellow housing and red button on the platform rail are a useful landmark. If the objective says to restore power, finish that requirement before trying to ride the lift; then use the reachable ledges to continue through the upper path.
- When an apparent way out becomes available, the story redirects Jordan toward finding DJ. Continue following that objective. This Terrible Lizards walkthrough does not treat the earlier exit opportunity as a separate ending.
- Read or watch Dalton’s material on the onward route if you want the story context. The recording’s sequence around 2:30–2:34 establishes his search for DJ. These story clues are separate from the machine controls needed for progression.
- In the large cavern, find the generator and restore power before searching for the remaining fuse objectives. Track each fuse installation individually. The recording reaches the generator at about 2:39 and then searches the surrounding structures for all four power points.
- With the four fuse objectives complete, return to the foreman’s control tower and release the minecart. Do not leave the cavern merely because the generator is running: the cart-release step is still required. Follow the resulting chase route into the final chapter.
If all four fuse objectives appear complete but the mechanism will not respond, inspect the objective text and each installation prompt. The developer has acknowledged progression bugs in this area. Use the official support/update information when the observed state contradicts the intended sequence; repeating a code will not repair a blocked fuse interaction.
References: FusionZGamer — full-game recording ↗ · WDR Studios — developer Q&A and narrative devlog ↗
Chapter 4: DJ, the fossil and the elevator key
The final chapter of this Terrible Lizards walkthrough changes the objective from following DJ’s trail to bringing him out. You still need several separate items: his tooth fossil, the demolition supplies and the elevator’s physical failsafe key. None is a substitute for another.
- Enter the Project Pilgrim area and inspect the surviving film equipment. Fellows’ recordings give context for the expedition and the material below the attraction. Continue through the machinery and traversal route until you reach DJ.
- Speak to DJ. He asks for an Allosaurus tooth fossil from his first dig with his mother, taken by Dennis. The requested object is a fossil, not a plush toy. Follow the route into Dennis’s hoarded-object area and retrieve it.
- After the lair encounter, complete the prompted escape interactions and return to DJ. His attempt to stop Dennis from hurting Jordan does not end the danger. Follow the new chase route when the attempted reunion breaks down.
- Continue to the underground camp and regroup with DJ. Operate the special-light equipment associated with the camp. These lamps are a distinct story and gameplay device; the Terrible Lizards walkthrough does not treat them as the ordinary attraction floodlights from Chapter 1.
- Inspect the elevator and the recording about its missing failsafe key. The clue points to Cavern B. Start with Cavern A to obtain the demolition supplies needed to open the blocked route toward B.
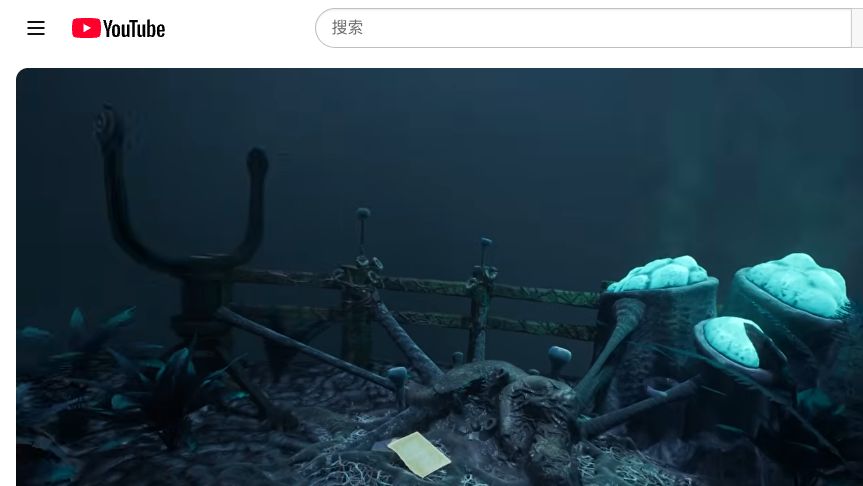
- Blast the obstruction and climb the rocky spire route in Cavern B. At the upper ledge, look for the remains and the note associated with Fellows; the lift key is at that location, reached around 3:35:26 in the recording. Follow the objective back through the cavern when you have it, completing the return-path demolition interaction where required.
- Bring the physical key to the elevator and operate its controls with DJ. When Dennis disrupts the ascent, follow the adjacent traversal route to keep up with the moving elevator. Watch for DJ’s prompt to jump back rather than waiting on a fixed platform.
- Complete the remaining climb to the surface and reach Stella’s car. That finishes the main escape. Use the plot guide for what the reunion and last conversation mean; this Terrible Lizards walkthrough keeps the focus on reaching them.
References: FusionZGamer — full-game recording ↗ · TheGamingBeaver — full-game recording ↗
Terrible Lizards walkthrough code reference
Use this Terrible Lizards walkthrough table as a location check as well as a number check. Entering a correct code at the wrong mechanism is still a dead end. If your own recorded clue differs, use the in-game evidence rather than forcing a number from this table.
| Door / mechanism | Code or item | Where to check |
|---|---|---|
| Attraction entrance | Read both paper halves | Your entrance clue; example numbers differ |
| Basement | 1903 | Stella’s instruction |
| Foreman’s tower | 0451 | Stella’s instruction |
| Damaged excavation keypad | Repair, then read the lab clue | Your field-lab record; numbers differ |
| Chapter 2 lift access | 1677 | Stella’s instruction |
| Dynamite locker | 0180 | Stella’s instruction |
| Final elevator | Physical failsafe key | Cavern B, reached using Cavern A supplies |
References: FusionZGamer — full-game recording ↗ · TheGamingBeaver — full-game recording ↗
After the final escape
The developer confirms one main ending and a New Game Plus unlock after finishing the game. This Terrible Lizards walkthrough therefore does not send you back through the campaign chasing an invented good-ending or bad-ending choice.
The announced replay modifiers are linked to amber collectibles: bodycam presentation, slippery surfaces, a challenge that punishes stopping, and low gravity. A new modifier is tied to each group of four amber. Those modifiers change how a replay behaves; they are not evidence that the story’s main conclusion branches.
References: WDR Studios — developer Q&A and narrative devlog ↗
Questions & answers
Why does an entrance code from another Terrible Lizards walkthrough fail?
Read both paper halves in your own game. Recordings and written guides show different entrance numbers. We do not infer the cause from that difference; use the clue actually provided to you.
What should I do before entering the upper excavation code?
Repair the damaged keypad with the required replacement parts, then read the field-lab record. A valid number will not fix a broken panel.
Where is the elevator key in this Terrible Lizards walkthrough?
The final elevator needs the physical failsafe key in Cavern B. Obtain demolition supplies from Cavern A to reach the blocked route, collect the key, then return to the elevator and DJ.
What does DJ ask Jordan to retrieve?
An Allosaurus tooth fossil associated with a dig with his mother. Dennis took it to his lair. Do not search for a Dennis plush as the required story object.
Is this Terrible Lizards walkthrough also a 100% collectible guide?
No. It covers the main objectives, major codes and escape sequence. It does not claim every tape, amber piece or optional collectible location.
Sources & references
- FusionZGamer — full-game recording ↗
- TheGamingBeaver — full-game recording ↗
- Into Indie Games — chapter one walkthrough ↗
- Into Indie Games — chapter two walkthrough ↗
- WDR Studios — developer Q&A and narrative devlog ↗
This route is based on the supplied full-game video transcripts, checked against the linked recordings, developer information and independent guides. It is not our own playthrough. Chapter 3 is an objective route summary, not a room-by-room collectible map. Video timestamps refer to the cited recording, not expected completion times.
Report a correction ↗